

How To Set Iso On Film Camera
ISO is one of the iii pillars of photography (the other two beingness shutter speed and aperture), and it has a major consequence on your images. How does photographic camera ISO bear upon your images? In this commodity, we volition introduce ISO for beginners and explain how to use it effectively for the all-time possible results.
Table of Contents
What is ISO?
In very bones terms, ISO is merely a camera setting that volition burnish or darken a photo. As you increase your ISO number, your photos will grow progressively brighter. For that reason, ISO can help you capture images in darker environments, or exist more flexible about your discontinuity and shutter speed settings.
Yet, raising your ISO has consequences. A photo taken at too loftier of an ISO will testify a lot of grain, besides known as racket, and might not exist usable. And so, brightening a photograph via ISO is ever a trade-off. You should merely heighten your ISO when y'all are unable to burnish the photo via shutter speed or aperture instead (for example, if using a longer shutter speed would cause your subject area to be blurry).
What is the Meaning of ISO?
The acronym ISO stands for "International Organization for Standardization". Withal, camera ISO does not direct refer to the system that creates various engineering and product standards. Ever since 2 flick standards chosen ASA and DIN were combined into ISO standards in 1974 (later revised for both film and digital photography), they were referred to equally one word "ISO" from that point on. Although ISO initially divers merely film sensitivity, it was later adopted by digital camera manufacturers with the purpose of maintaining similar brightness levels as film.
Common ISO Values
Every photographic camera has a different range of ISO values (sometimes called ISO speeds) that y'all can use. A common set is equally follows:
- ISO 100 (depression ISO)
- ISO 200
- ISO 400
- ISO 800
- ISO 1600
- ISO 3200
- ISO 6400 (loftier ISO)
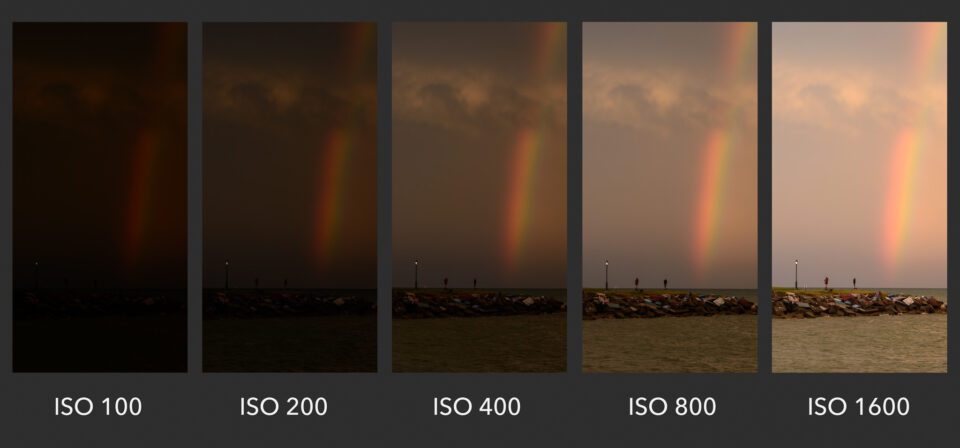
Quite simply, when you double your ISO speed, y'all are doubling the brightness of the photo. And then, a photo at ISO 400 will exist twice brighter than ISO 200, which will be twice brighter than ISO 100.
What is Base ISO?
The lowest native ISO on your camera is your "base of operations ISO". This is a very important setting, because it gives yous the potential to produce the highest prototype quality, minimizing the visibility of racket as much every bit possible. Some older DSLRs and a number of modern cameras, such every bit the Fuji X-T2 have a base ISO of 200, whereas about mod digital cameras have a base of operations ISO of 100. Optimally, y'all should always endeavour to stick to the base ISO to get the highest prototype quality. All the same, it is non ever possible to exercise so, particularly when working in low-light atmospheric condition.
Side note:
Some cameras have extended "HI" and "LO" values for ISO that might stretch beyond their native range. Withal, these are completely simulated and lower your image quality. Nosotros recommend avoiding them.
Low vs High ISO Noise Visibility
To give an example of ii photos taken at different ISO values, take a look at the comparison below. Pay attention to the level of noise (graininess and blotchy colors) in the images:
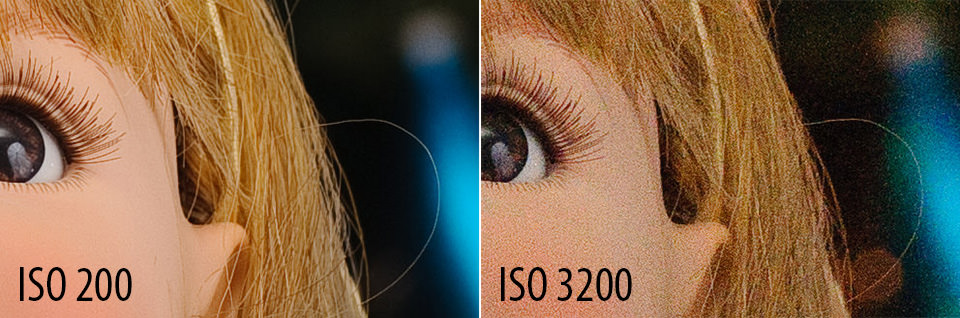
The departure is clear – the image at ISO 3200 has much more noise than the one at ISO 200 (which I brightened with a long shutter speed instead). This is why you should avoid loftier ISOs whenever possible, unless atmospheric condition require you to use them.
How to Change ISO
Irresolute ISO varies from camera to camera. Hither are some mutual ways to change ISO:
- To start, enter a mode that lets you select the ISO yourself. Get out of Auto mode, and go to Manual, Shutter Priority, Aperture Priority, or Program (we tend to prefer Aperture Priority or Transmission).
- For entry-level DSLRs and mirrorless cameras, you probably need to open a menu (mayhap the "quick menu") and detect the section for ISO. Select the value you desire, or set it to Car.
- For higher-end cameras, there may be a dedicated "ISO" button on the camera. Press it while spinning one of the wheels to alter your ISO setting. If you don't run into a button labeled "ISO", it is yet possible that your camera volition let y'all program one to perform this task.
- Other cameras may accept a defended cycle that already has diverse ISO settings marked. This makes things even easier.
Check your camera manual if you still aren't sure. All the same, it is worth being very familiar with how to change your ISO setting chop-chop, since it's something you will probable be adjusting quite oftentimes, especially if you lot shoot in low calorie-free conditions without a tripod or flash.
What Camera ISO Should You Employ?
Many photographers sympathize the nuts of ISO, but they aren't sure which ISO value to really option in the field. In practice, there'south a reason why your photographic camera allows such a wide range of ISO settings: Unlike situations call for different ISOs. Below, nosotros will cover some of the common scenarios you may come up across.
When to Use Low ISO
Every bit discussed above, you should always endeavour to stick to the everyman ISO (base of operations ISO) of your photographic camera, which is typically ISO 100 or 200, whenever you tin. If there is plenty of light, yous are free to utilize a depression ISO and minimize the appearance of noise as much every bit possible.
Even in dim or nighttime environments, y'all still might be able to use a low ISO. For case, if you have your camera mounted on a tripod or sitting completely still on a tabular array. In that instance, you can safely apply a low ISO and brighten your photo via a long shutter speed instead, since yous won't introduce camera milk shake. Yet, keep in heed that if your camera does apply a long shutter speed, anything that is moving will look like a ghost:
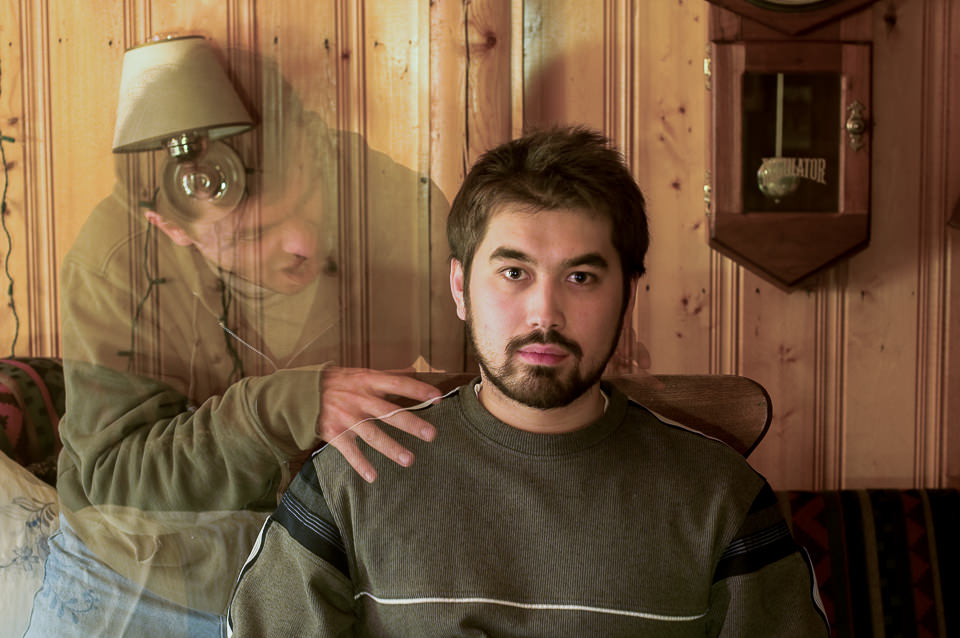
Just kidding, of course! That's my lovely nephew being the field of study of my long exposure exam. I set the photographic camera to the lowest ISO to retain the detail, which required a long shutter speed of 5 seconds in lodge to capture a vivid enough photo. My nephew sat still, while my friend stepped in for a cursory moment to introduce the ghost.
When to Use High ISO
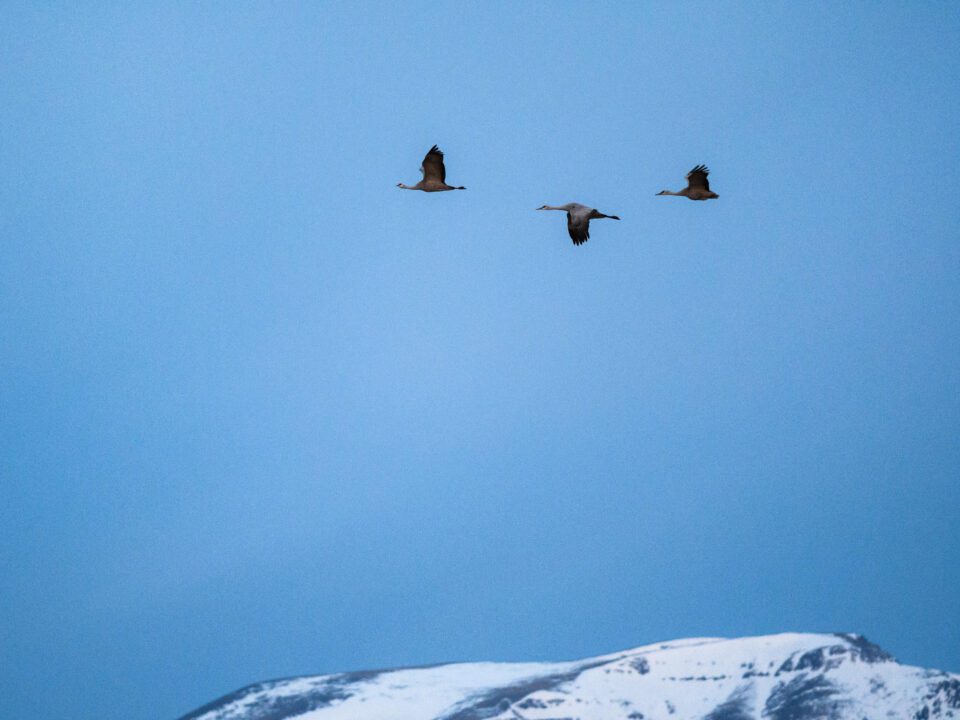
Even though information technology is platonic to utilise low ISOs, there will be enough of times when a high ISO is necessary in order to take a proficient photo in the first identify. The simple reason is that yous are often fighting confronting motion blur, and you will need to selection betwixt a sharp photo at a loftier ISO, or a blurry photo at a low ISO. Take a wait at the epitome below:

I captured these Black Skimmers at ane/2000th of a second and ISO 800. Here, my camera needed i/2000th of a second to fully freeze the birds while they were in flying. What would have happened if I had gear up ISO 100 on my camera instead? I would have needed a shutter speed of 1/250th of a second to capture a bright photo. At that setting, there would have been a lot of unwanted motion mistiness in the picture, since the birds were moving so fast. In brusk, I would have ruined the picture.
The bottom line is that you should increase the ISO when at that place is not enough light for the camera to capture a sharp, bright photo any other way. When I shoot handheld photos indoors without a flash, I always set up my ISO to a college number to capture the moment without introducing mistiness. Or, when photographing ultra-fast action similar in the bird movie above, raising your ISO is often necessary.
On well-nigh cameras, there is a setting for Auto ISO, which works nifty in low-light environments. The beauty of this setting is that you input the maximum ISO you are willing to use, so that the camera does non cantankerous that limit. Personally, if I want to limit the corporeality of noise in a photo, I will set my maximum ISO to something like ISO 800, 1600, or 3200. The downside is that the photographic camera will offset using progressively longer shutter speeds if it reaches these ISO limits, which leads to more motion blur. Everything is a merchandise-off!
Minimizing Noise and Maximizing Image Quality
Some photographers think that the best way to capture high-quality images is to employ Base ISO 100% of the time. However, as demonstrated above, that only is not true. Sometimes, y'all'll be in dark environments when you have no selection merely to use a higher ISO.
You should but employ base ISO when at that place is enough light to do then. Don't try to force ISO 100 in a dark environment, or your photos will come out way too nighttime. Similarly, if you're using a fast shutter speed to capture action, it's substantially the aforementioned as taking pictures in a night environment (since yous strictly limit the corporeality of fourth dimension your camera sensor is able to capture lite). So, for certain types of sports and action photography, a high ISO might be your just option.
To maximize your image quality, here are the iv steps you need to follow:
- Select the aperture setting that will provide your desired depth of field.
- Ready your ISO to its base value, and put your shutter speed to whatever setting provides a proper exposure.
- If your bailiwick is blurry, progressively raise your ISO and use a faster shutter speed until motion blur disappears.
- If your ISO is getting too high and you still accept the ability to use a wider aperture, open it upwardly until the ISO gets to a more manageable level, even if information technology means sacrificing some of your desired depth of field.
That'due south all it takes! If you follow these steps, you lot'll capture the maximum image quality each time. You'll find the ideal residual between noise, movement blur, and depth of field.
Common ISO Myths and Misconceptions
ISO has a lot of myths surrounding it, including some that are quite common to hear. In this section, we will quickly accost some of those concerns so that yous are not misled about this topic in the hereafter.
Is ISO "Sensor Sensitivity"?
This is the most common myth related to ISO. It is something you will run into all over the web (and in print). However, although it may assist y'all to think of ISO every bit "interim similar" camera sensor sensitivity, that's non what it actually does. Instead, digital sensors only have a single sensitivity, regardless of your ISO. Information technology is more accurate to say that ISO is like a mapping to tell your photographic camera how bright the output photo should be, given a particular input exposure.
Is ISO Function of Exposure?
No, ISO is non office of exposure. Shutter Speed and Discontinuity brighten your photograph by physically capturing more light. ISO doesn't do that; instead, information technology essentially brightens the photo yous already captured. And then, photographers don't consider information technology to be a component of exposure.
Is Raising ISO Merely Like Brightening Your Photograph on a Estimator?
This is a clever question, merely, again, it is simply a misconception. Brightening a photo on your figurer can act in many means like raising your ISO, since it does make dissonance more visible (and information technology leads to a brighter paradigm). But the simple difference is that raising your ISO in the photographic camera nearly always provides amend prototype quality than brightening a photo on your calculator. In other words, it is better to use ISO 800 when necessary, rather than brightening an ISO 100 photo to a huge degree in mail service-processing software like Lightroom!
How Does ISO Affect a Photograph?
ISO increases or decreases the brightness of a photo, merely besides affects both grain / noise levels and dynamic range. At the everyman (base) ISO setting, your images volition have the least amount of noise and the highest dynamic range, giving yous the about flexibility in postal service-processing. As ISO is increased, racket levels increase and dynamic range typically decreases every bit well.
What is the Best ISO Setting for Depression-Light?
When shooting in low-light conditions, your shutter speed will typically decrease, resulting in camera shake or motion blur. To avoid such issues, you should increase ISO setting to a higher value, such as ISO 1600. Depending on your aperture and calorie-free conditions, you might need to increment ISO fifty-fifty more.
What is the All-time ISO Setting for Mural Photography?
When photographing landscapes, you should apply a tripod and fix your ISO to your photographic camera's base of operations ISO, which is typically 100.
Conclusion
If yous take any questions, comments or feedback, please postal service them in the comments section below.

How To Set Iso On Film Camera,
Source: https://photographylife.com/what-is-iso-in-photography
Posted by: rodriguezsayoulactir.blogspot.com
0 Response to "How To Set Iso On Film Camera"
Post a Comment